Yesterday, I started building a bot to automatically tweet about the new articles I write on my website. In this article, I will share the simplest bot you can build and more importantly will share a few tips about how to deal with authentication/authorization especially if you want the bot to tweet on your behalf only, and if it is not supposed to impersonate other users. Please bear in mind, Twitter API is actively being updated, so this might change in the future.
I already had the experience of building a Twitter bot in Node.js back in 2019 when I created @laravel_tweets bot in TypeScript and Node.js. I remember, about a year after that, more precisely on August 12th, 2020, they officially introduced the Early Access release of Twitter API v2. Through these years they had gradually introduced these v1, v1.1, v2 different endpoints where each of them can only be used in certain scenarios, and to make it even more complicated, none of them supports all their supported ways of authentication and authorization, so it is your job to figure out what can be done with what.
The bot itself
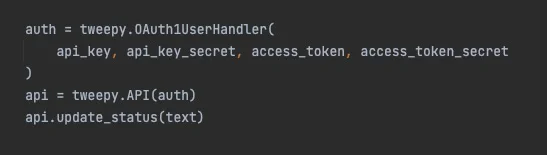
If you use the tweepy package, the bot itself will be pretty simple. For example, to tweet a new update from your account you can simply use this code:
api_key = "fetch_the_value_from_a_secure_place"
api_key_secret = "fetch_the_value_from_a_secure_place"
access_token = "fetch_the_value_from_a_secure_place"
access_token_secret = "fetch_the_value_from_a_secure_place"

text = "A simple text!"

auth = tweepy.OAuth1UserHandler(
api_key, api_key_secret, access_token, access_token_secret
)

api = tweepy.API(auth)
api.update_status(text)
Authentication
You can deep dive into the Twitter's official documentation here. Also, if you use Tweepy package, you can check here to see how you can authenticate using this library.
But, if you are as impatient as I am, and you only want to send a tweet to your own account, here is the list of things you should do:
- Cry a bit! I'm joking, not yet at least...
- You need an approved Twitter developer account. If you don't have one, you should apply for access.
- You should already have or create a new Twitter developer App. You can create a new one or access the existing ones in the Projects & Apps section of your developer portal.
- To create a new tweet on your behalf, you should also apply for Elevated access. You should write a bit about why you need this access, how your project would function, and also share with Twitter what is your level of technical skills. You should also carefully read their terms and conditions to stay compliant. To be honest, for being able to just send a simple tweet, applying for such access seems a bit overkill to me, because with that you can send over 2M Tweets per month and have 3 different environments (production, staging, development).
- If you do not apply for the Elevated access, you will get this error message when you attempt to send a tweet:
453 - You currently have Essential access which includes access to Twitter API v2 endpoints only. If you need access to this endpoint, you'll need to apply for Elevated access via the Developer Portal. You can learn more here: https://developer.twitter.com/en/docs/twitter-api/getting-started/about-twitter-api
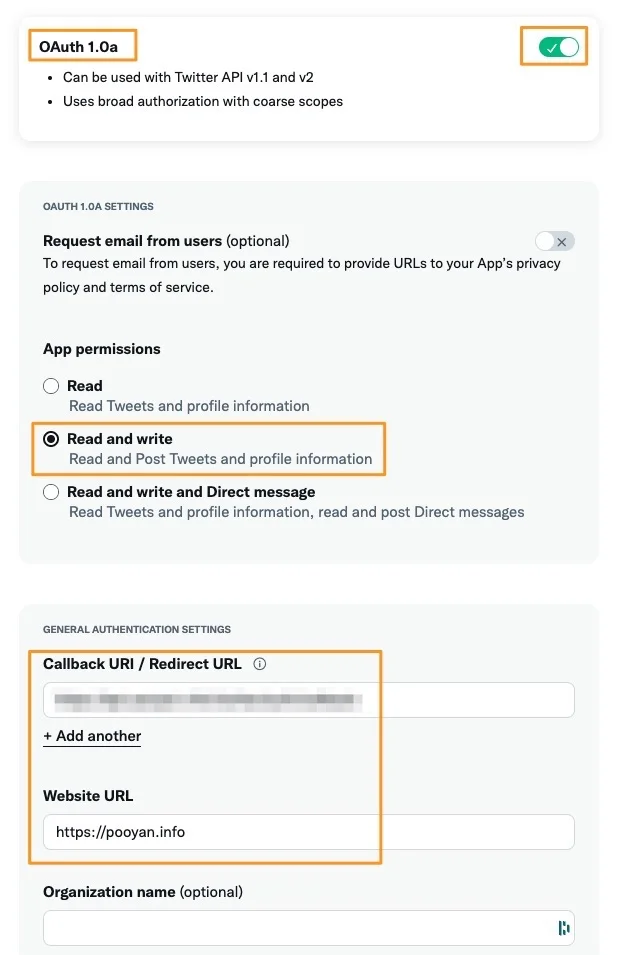
- You should use user context authentication using OAuth 1.0a
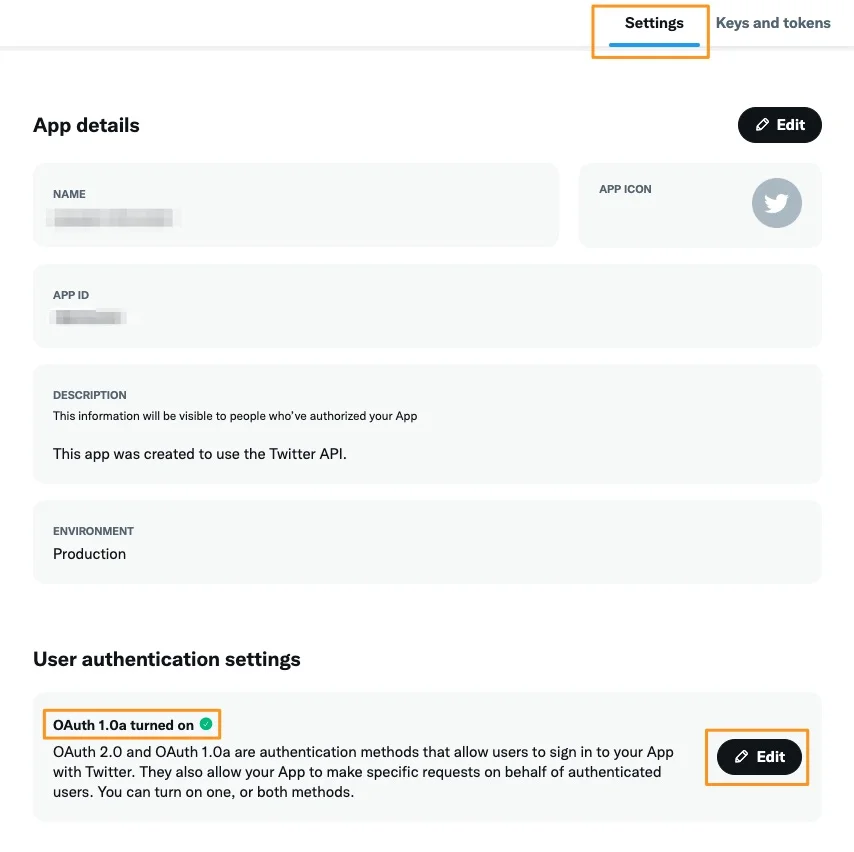
- In the developer portal, select your application, then select the right environment, and then from the settings tab, below the "App details" section you should see another one called "User authentication settings". Click on that and turn on the read/write access for OAuth 1.0a.
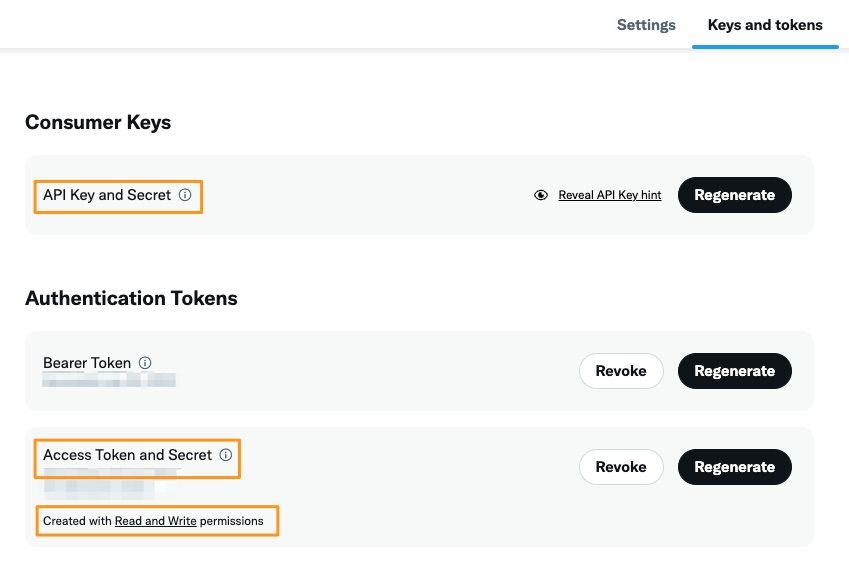
- Then click on the Keys and tokens tab, and generate two sets of pairs of keys and tokens, one pair for API Key and Secret and another one for Access Token and Secret. You should do this only after having given the read/write OAuth 1.0a access, otherwise you should wait a bit and generate them again. You can also regenerate these keys later from the same tab, if you want to periodically rotate them manually or if you have lost them.
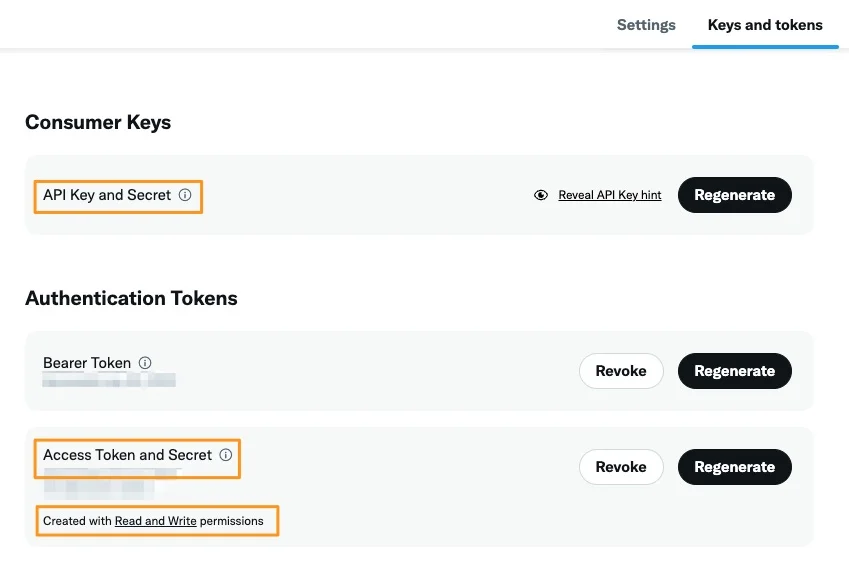
- Make sure you store these two pairs of keys and tokens in a very secure place, and DO NOT share them publicly, or add them to a git repository, or share them with anyone.
Congratulations! Now with these keys and tokens, you can send your first automated tweet to your own account.
For simpler scenarios, if only read-only access to public information is needed, you can generate and use a bearer token.
For more complicated scenarios, where your bot needs to impersonate other users and perform actions on their behalf, you should use "3-legged OAuth flow" for OAuth 1.0a or "Authorization Code Flow with PKCE" with OAuth 2.0. Also, in such scenarios, when you apply for the access, you should also fill more details about your bot and what will you do with the analyzed/gathered data.
Last but not least, again, make sure you carefully read Twitter's terms and condition!